How to: Install your new sway bars!
First off, I'm not a professional mechanic but I hope I was thorough enough for any novice mechanic to be able to do this. if not, feel free to PM me or ask in comments.
If I did something the hard way/stupid way. correct me. List of things you will will need: Jack, using two is preferred for lowering subframe. Jack stands (4) 4-way. 3/8 ratchet 2" extension 15mm deep socket 1/2 inch socket 18mm socket 13/16 socket 3/8 open end wrench Seems like I used more than this? sway bars, bushings, grease that came with them. Power tools are a God-send. Time. First, Break lugs loose(don't remove) and jack up your car and place SECURELY on jack stands ( I had 4, if you only have two then alternate between front and rear and be sure to BLOCK YOUR WHEELS) remove wheels.  Note: since I was cheap while installing struts and spring I now have to change strut mounts, so I had strut assemblies removed during this process. Rear, this is by far the easier bar to install first, remove your end links from both sides (15mm)  next are the two inside mounts, 1 bolt each 15mm.  . .now you can remove your rear bar and replace with your new bar/bushings starting with the inside mounts. for the two mounts you have to slide the tab on top into the slot then bolt it down. replace end links, DONE. now for the "FUN" bar. looking at the drivers side A-arm you will need two ratchets or wrenches both 1/2" to remove this bushing.  now time to lower the subframe. place your jack under one section and put pressure on the subframe, but not enough to raise the car off of the jack stands, remove these four 15mm bolts (2 on each side)  these two (only one pictured), side by side behind trans fluid pan (LA1) 15mm deep socket+extension IIRC  this bolt, just behind the previous two, backside, center of the subframe. 15mm  another (this one is nice to have an air ratchet as its the longest effing bolt I've seen in my life) holds the backside of the A-arm. another 22mm I believe.  now you can probably lower the rear of the subframe enough to remove the sway bar mounts, but you probably can't remove the bar. moving to the front of the subframe this bolt is a 13/16" there are two of these, one on either side. remove them.  three in the front/center unpictured, 18mm. you can now lower the subframe enough to get the bar out, but first you need to undo the mounts. from here you can see the bolt for the drivers side mount, 15mm same design as the rear but now the bolt is on the backside, tab on the front. (its nice to have a ratchet with an extendable handle here).  now time for the passenger side mount. the nut on top is a 3/8" remove it then move the lines out of your way and use your 15mm deep socket on the bottom.  now remove the bracket and bushing from the bar and you will be able to pull it out from the rear of the subframe.  put your bushing on the new bar and push it back on top of the subframe.  now position your bushings correctly  grease your brackets and push them over the bushings, be sure to slide the front tab in the slot. bolt both sides down and bolt your subframe back up.  now replace the bushings on both ends  put everthing back together and go drive! :awesome: If I left anything out feel free to add info. |
+1 Rep...Amazing How-to.. you'll be saving a lot of people money!
|
im jealous of that rust free looking car...
|
I give you rep just for taking the time to do this.
|
Repped!
|
wow thanks guys lol, I didnt think it was that great.. I guess I'll have to make more of these.
Quote:
it spent most of its life in New Mexico, since being is KS for two years its getting worse, I may por-15 the underside sometime this year. |
It's not overly complex, it's just a pain.
Kudos for DIY'ing this job. |
Quote:
my old LD9 alero came from new mex and it was 100% spottless... now a dumbass female is beating the shit out of it. |
When you remove the front subframe bolts, what is holding it up? Do you only need jacks at the back of the subframe? Does the engine lower with the subframe?
|
Quote:
you still have engine mounts holding the engine, it will move but shouldn't fall. I had one jack on the rear and one on the front. you don't have to lower it much, 3-4 inches will suffice. Quote:
|
good write-up
|
They sun fade in NM like a mother though
|
also good to note.. if you do unbolt the cradle and lower it... you maybe effect your alignment angles a little. if it were me giving professional opinion id say you need an alignment afterwords.
|
I'm glad you have the LA1 it'll make more sense now
|
You misinformed on the 22mm bolt, it is a 21mm. Great write-up, doing this now and taking a video.
|
Lol! You got first post smoked
|
:haha:
So I got the subframe down, now having trouble with the sway bar mounts. The passenger side one keeps spinning so I can't take the nut off. The bolt underneath isnt where the hole is on the subframe, so I can't just stick a socket in.... I also was able to get the subframe low enough without taking apart the suspension at all (e.g. knuckle bolts, tie rods, sway bar end links). I loosened the forward mount bolts and subframe bolts, and took out all the rear ones. With all due respect, I a 21mm socket for those 2 forward subframe bolts as well and the nut on top of the passenger sway bar mount bolt is 10mm. I know this because I used a open ended wrench, the 3/8 didn't fit. |
1 Attachment(s)
Ha, GM Engineers tricked me. More like I had a derp moment, the bolt is double threaded like Darth Maul's Lightsaber. This caused me to think the bolt wasn't unthreading because the top thread was moving with the bolt head. I missed my coffee this morning I think. :p
|
I cannot for the life of me figure out how to take out the old endlinks.... Anyone have any info/ideas?
|
2 Attachment(s)
So was there any modifying to the bushing to be done? I cant even get the bar mounts to screw in, the bushing is too big....
EDIT: So I was looking at the OP's pic of the bushing mount, mine is all crooked on both sides. I'm afraid I put the bar in upside down or maybe I just have to tilt it a different way, still messing with it. EDIT2: I have decided that my bars don't fit... Does anyone have any pictures of their bars? The part where my bushings go isn't perpendicular to the center-line of my vehicle like the stock bar. This causes my mount to angle outwards from the car... Here is a picture of the bar next to a straight bar, the part where the bar mounts is at the end of the red bar. (I moved the bushing for comparison purposes) |
mine fit in. the bushings were a real bastard though. just took lots of wiggling and squeezing
|
If you put the end links in first then the bar should pretty much line itself up where the bushings go. As I said on your post over on GAO, the new bushings are a bit taller than stock, but the grease able Energy Suspension bushings I bought are the same height as stock.
|
Yeah, I failed and grabbed random sized ES regreasables not realizing that the bracket would be a different size, so now I'm stuck with 2 sets of bushings I can't use or sell.... at least i got them for cheap. Anyone have a size for the bars? I still haven't seen anything about that.
I put the bar on the links, this did not help any, the bar still needed to move forward a bunch for the bushing bracket to fit in the slit, and then it wouldn't fit in correctly. I even had someone hold the other end while messing with one side. |
A few of my front swaybar install pictures....
I hope these pictures are of some value to anyone who bought the new swaybars and are deciding if they want to tackle this job themselves or not. It's not overly difficult but does require some time and patience along with a few bruised knuckles and bumps on the head. :lol: It can be dangerous if you're a novice mechanic and don't really know what you're doing so seek out an experienced helper if you're unsure of your mechanical abilities.
The installed swaybar in place....1999 Pontiac Grand AM SE 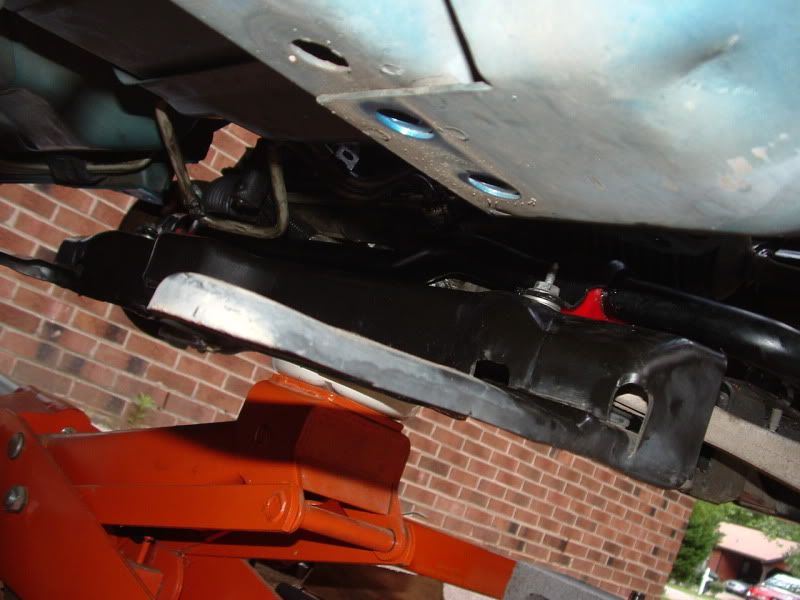 Passenger side view...I used the bushings sent with the bars and the stock brackets. I tried installing Energy Suspension greaseable bushings but the supplied brackets simply would not mount correctly even with modifications. 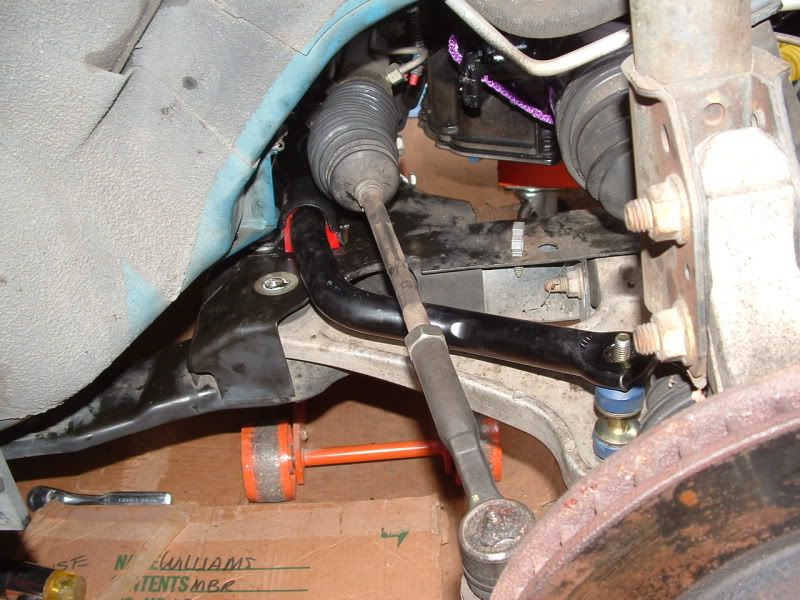 Driver's side view....I'm still struggling trying to get the new endlinks installed. 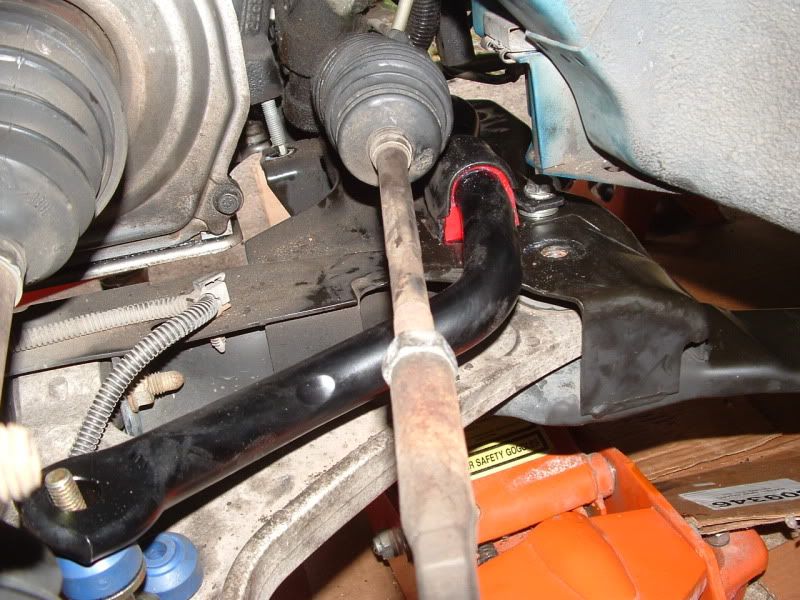 I ended up putting a few shim washers under the stock brackets on each side to account for the extra swaybar thickness over stock because the bracket bolts would never bottom out on the subframe like stock with these bars and I wanted the bolts to be rock solid tight. 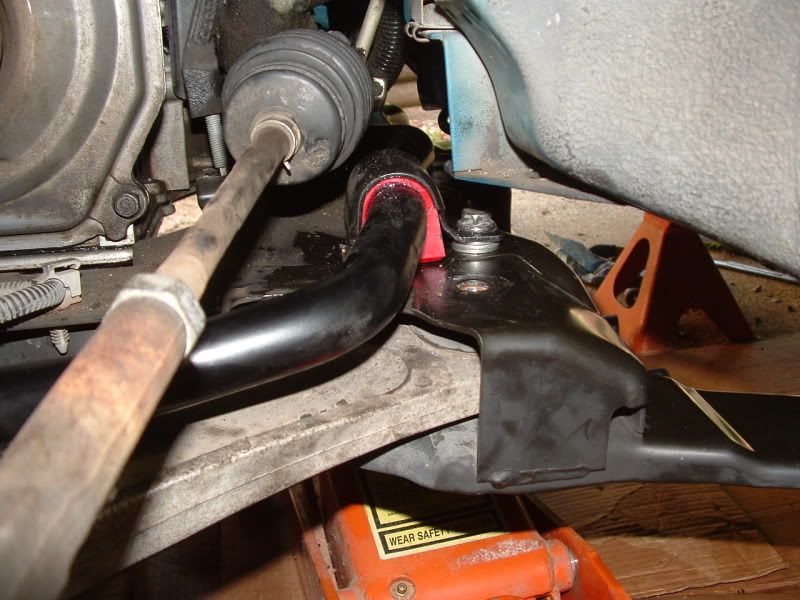 Better view of installed bar..... 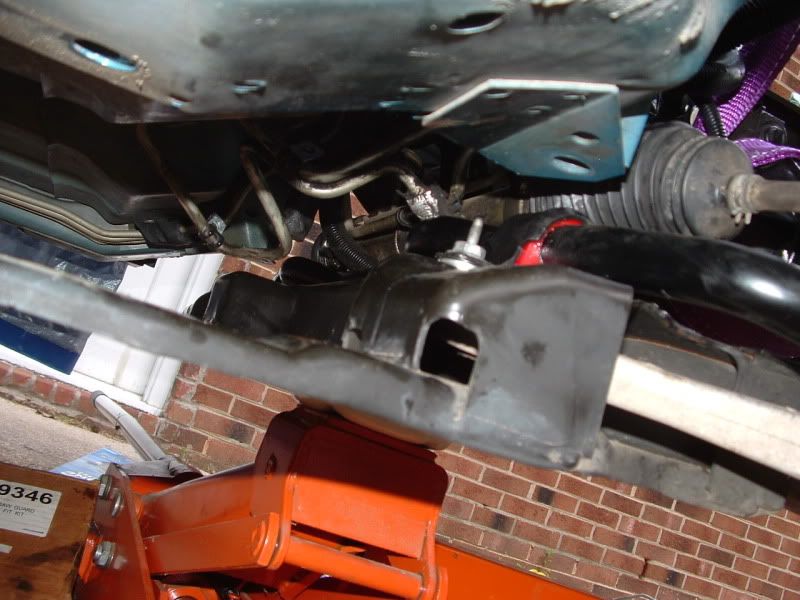 A few other tidbits....I highly recommend removing the intermediate steering shaft from the steering rack before dropping the subframe. Simply lift up the rubber boot and remove the pinch bolt, then push the intermediate steering shaft up and off the stub on the steering rack. Sorry I did not take a picture of that, but it's real simple although working space is a bit tight in that area. Finally, my car does not currently have an engine installed because I'm in the process of doing a 3500 engine swap, so I attached my engine hoist to the transmission to hold it up while I loosened the trans mounts and lowered the subframe. I hope to drop the 3500 engine in next weekend weather permitting and will install the new rear swaybar after the engine is installed. |
That is nice that you didn't have an engine, you have a couple more inches than I do to work on the brackets. The tops of my brackets keep hitting the cabin frame when trying to install.
Your bar also looks like it is set straight in the bracket, you wouldn't happen to have a pic of your bar pre-install? The part where mine mounts is in an awkward angle compared to the rotational axis. (see above pictures. I compared the bar to stock, and that section is definitely at a different angle than stock. I am about to delve back into installing the bar anyways. I figure I should be able to at least get one mount bolted down and then bend the bar back to bolt the other bracket down. |
Quote:
front bar  |
2 Attachment(s)
Well with a ton of elbow grease, I was able to get the bar in. I'm afraid the bar might be messed up though. It definitely doesn't sit even close to straight in the bushings. I don't know whether to try and pull the passenger side bushing out and mount it the correct way or not because it was so gnarly trying to get the bar in. Mine definitely doesn't settle the way yours does.
|
1 Attachment(s)
So I put my new endlinks in, i stripped the old ones when hitting the bolt with the hammer. I sprayed some brake cleaner (that stuff works on everything) and hammered the heck out of it until they came out. The energy suspension spacer is a mm or two longer than stock, so I decided to reuse the stock spacer by boring it out and cutting the tabs.
I have a new problem. I cant get my rear trans mount bolts to line up with the subframe holes..... I'm looking into maybe putting a board under my trans and jacking it up, then jacking the subframe up? Figured I would keep up to date with you guys. |
good idea to be putting some assembly grease (for those of you using non-greasable bushings) inside the bushings where the bars contact and a thin coat on the outside where the bracket contacts. help against wear and tear/assembly/ and noise.
|
OH MY GOD YES!!!!!! Time to do the rear. I wasn't aware that rear transmission mount could move, I was able to position it correctly and then re-lift the subframe. It handles so good I almost don't even want to do the rear bar, I'm afraid of the pure sex that will ensue afterwards.
|
Quote:
We'll hear no more of this nonsense. |
Quote:
I used whatever grease PFYC sent with the bars. I did purchase Energy Suspension grease-able bushings and while the bushings themselves fit great, I simply could not get the supplied brackets to work right for this application. Too bad Energy Suspension doesn't make vehicle specific brackets instead of taking the more generic one size fits all approach. |
Sorry I didn't get back sooner, had to go test out the GA. Anyone have any ideas on how to clean human body fluids out of the interior? If I have got these a long time ago, I probably would have waited longer to buy my AGX's and Eibachs.
This is an amazing upgrade from stock with all polyurethane bushings and well worth the money. There is absolutely no nose dive taking corners any more. I haven't had any problem with the rear wanting to come out, and the suspension is fairly neutral which is nice. I haven't noticed any luxury hit with the polyurethane and stiffer bar, everything feels more solid now too which is a big plus. I can't wait to see how the car acts with the AGX, Eibachs and Grand Prix lateral arms. Thanks a bunch for the write-up 03sleepr, it helped a bunch. +rep |
I'm getting anxious to get these damn bars on.....all these good reviews makes me excited! I have the bars/strut mounts and hubs all in my back seat. Gonna do the hubs and rear brakes this weekend.
|
Quote:
no problem! I enjoyed making it, it also helped so I didn't rush through the install. thanks! Quote:
hurry up and get them on! |
ok, can somebody tell me what kind of swaybar you all are installing?
What are the technical specs? otherwise, so far it looks pretty good. And good to know how far I can lower the K-Member, cause my chassis points there are really rusting out :( |
Well when I loosened the front bolts and took out the 3 rear bolts on either side, as well as the 3 rear trans mount bolts, the frame lowered about 3-4 inches. The stock bar was harder to get out of there than the Speedbuilt bar from PFYC. The only trouble is the brackets, at least on my bar, the others' bars look like they fit fine.... I needed another set of hands to get the last bracket on, I recommend starting with the passenger side.
I'm pretty sure the front bar is roughly 26mm (If i had to guess, 26.8) and rear is roughly 22mm (22.2) The biggest difference from stock (that you will notice) is not better handling, but better weight shifting when cornering. The car rolls more sideways than forward now (as well as much less roll), which allows better traction as the weight distributes more evenly on the tires. Don't be mistaken for elimination of G-forces, I definitely feel these much more:cool: . This is because your body no longer wants to fall out of the car so much as slide out. I must say the handling has improved quite a bit though, the stiffer rear bar definitely helps with the turns. |
Is the bar supposed to curve upwards or downwards? If mine curves downwards it touches the edge of the subframe beside the brackets. I took a little bit off the bottom of the bushings because there was no way they were going on with the stock brackets. I only took less than a 1/4" off the bottom, that shouldn't have lowered it enough to bottom out, right?
|
Quote:
The bar ends should curl upwards at the endlinks. See the pictures I posted earlier. The stock brackets will fit the new bushings, however the brackets won't bottom out against the subframe when bolted down due to the extra thickness of the new swaybar. I shimmed mine with a few washers so the bracket bolts could be securely tightened down as seen in the photos. I finally got the new Moog endlink bushings installed, but I had to use the spacers from the old stock endlinks in order to get them to fit. |
Quote:
I have a clunking on my right side that I haven't figured out, I also cut my bushings. I wonder if this is what is happening, it is already decently close to tapping the control arm. Quote:
Semi-true; the reason it won't bottom out is because of the extra height of the bushing, which is because the bar is fatter. Even with the bar bigger, they could've supplied bushings that would fit perfect, I am starting to think there is a reason they are taller. I think I might go back and take the brackets off one day and put the washers in like you did. I just dread that day with a passion. :lol: |
| All times are GMT -4. The time now is 01:30 AM. |
Powered by vBulletin Version 3.6.0
Copyright ©2000 - 2024, Jelsoft Enterprises Ltd.