Taken from....
http://www.evilmadscientist.com/article.php/LEDpics
------
Photographing LEDs
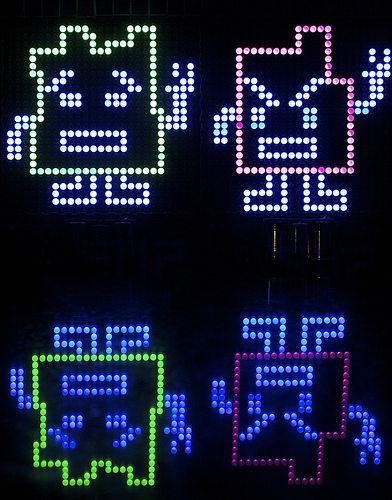
Photo by
Bill Bumgarner (
some rights reserved)
Taking pictures of LEDs can be difficult. Digital camera sensors just don't respond the same way that human eyes do, so it is nearly impossible to take a picture that reflects what you are seeing. But manipulating a few settings like white balance and shutter speed can improve things immensely, as can simple physical things like using a tripod.
In the lovely photo above, two LED displays are propped up on a reflective stone countertop. The vivid colors we want to see show up in the reflection, and the LEDs facing us head-on illustrate how washed-out they can look as the camera sensor gets saturated.

In the examples here, white, red, green and blue LEDs are installed on a
Peggy 2 board. In dim room incandescent lighting, we gradually increased the shutter speed. Starting with low shutter speeds, the LED colors gradually become visible. As shutter speeds increase further, the camera sensor gets saturated and all of the LEDs appear white. Finding that sweet spot will vary depending on your camera, your LEDs, and the ambient lighting.
If you want to play around with your aperture and shutter speed, it will help immensely if you have a tripod. Longer shutter speeds are hard to do (even with image stabilization) without a tripod, and as you narrow your aperture, you'll want to see how long you can extend your shutter speed. A tripod also lets you get multiple shots of the same subject with different settings so you can really compare your results.

It can also allow you to get images for trying out HDR, as in the photo above.


It was made by combining the photo on the left that is so dark you can't see the circuit board, and one on the right that was so bright that the LEDs all appeared white. The combined image hints at the incredible brilliance of the LEDs while allowing their colors to remain visible.
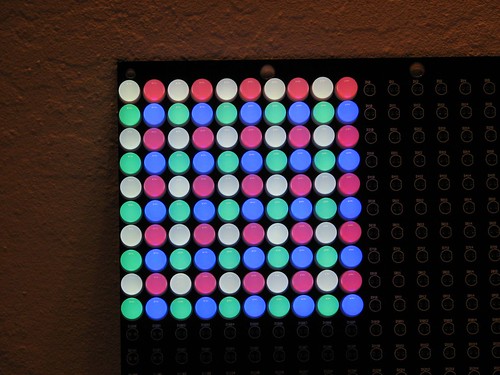
These 10mm diffused LEDs are some of our favorites. They're fairly well matched in brightness across all of the colors we get and they have a wonderful tactile feel. When they're installed next to each other like this, the light from one bleeds over to the neighboring LEDs. The color bleeding is most obvious with the red ones, which show a bit of a pinker hue when they are next to the blue ones. The red ones in the top row above look distinctly different from the ones bordered by two blues each. This is not necessarily a bad thing-- if you want to make a giant RGB display out of these LEDs, the pixels will bleed together beautifully.
While some color oddities can occur from proximity, your camera can introduce even more severe color changes. An extremely important setting to keep in mind is white balance. Most digital cameras can automatically adjust to the lighting around them or can be set to a particular kind of lighting. LEDs do not appreciate this feature. If you want to make your LEDs look good, turn your camera's automatic white balance off or switch it to daylight mode.


In the first photo above, the white balance is set to tungsten to accommodate the incandescent lighting in the room. The second is set to daylight. The color of wall behind the first looks closer to how we perceive it (a neutral off-white) but the LEDs look like they are way off on the green end of the spectrum. The wall behind the second looks very yellow from the incandescent light, but the LED colors are true. The wall is actually reflecting the yellowish light from light bulbs, which is what the camera sees, but our brains adapt extremely well to the lighting we're in and we perceive the wall as white.
Both of these photos were taken in a room lit with fairly bright incandescent lighting, reducing the need to resort to complicated tricks like HDR. Indirect daylight for your LED photos would be even better to prevent the spectrum skew of artificial lighting, but more light is generally better than less even if all you can get is a light bulb. And if you're at all like us, your LED project photography does not often coincide with readily available daylight!


 good idea


 Linear Mode

