01-22-2005, 11:45 PM
|
#1
|
|
Gone
Join Date: Mar 2004
Location: Lockport Ny
Posts: 19,244
|
ok... so here's what you'll need.
-decent length screwdriver (flathead)
-soldering gun
-hot glue gun
-wire cutters/strippers
-few small pieces of balsa wood
-bunch of wire
-some epoxy
-Paitence
- 7 oznium (or equivalent) LED's
and an optional beautiful assistant.
Start things out by taking your glovebox; radio trim; PNRD123; and little coin holder on the right of the steering wheel, right out.
- the glovebox has several screws holding it in, then it just slids out with a good tug.
- the coin holder should just pull right out
- the PNRD123 plastic should pull out if you reach into the cubbie grab the little lip edge and pull up on it. (after removing the small staple holding your shifter in, and removing it by pulling it up and off)
-Next, just give the radio trim piece a good pull and the clips should pop outta place and it will come off easily.
- Then remove the radio. (take out the screws, disconnect the wires from the back, and place it somewhere safe)
|

|

|
|
01-22-2005, 11:53 PM
|
#2
|
|
Gone
Join Date: Mar 2004
Location: Lockport Ny
Posts: 19,244
|
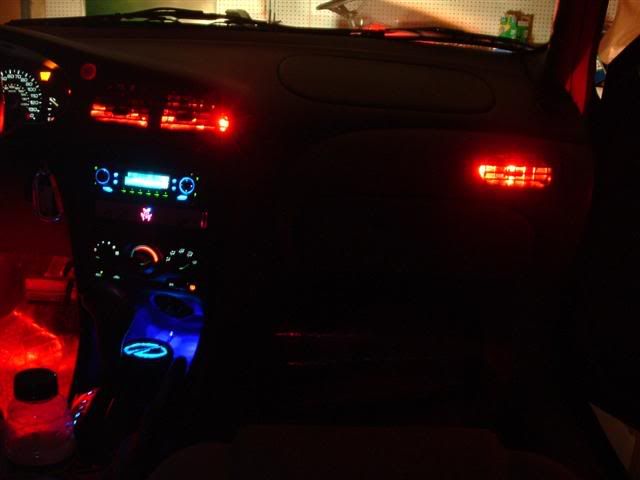
Now starting with the glove box, take the a light and look up into where the clips are for the left-most vent. Then take the screw driver and push one clip up at a time, while pushing the vent outward. One then the other, and the vent should pop out right into your hands.
The center vents are just as easy, you can litterally see the clips w/ the radio removed. Push up on each and the vent should come out.
The right most vent i had some trouble with. The hold is rather small, put you should be able to feel a small clip up in there. Push it up and grab the bottom of the vent as it pushes out, then the other clips will just follow suit. This vent had the switches below it, so besure to unclip the wires from their harnesses. (they should have little pry tabs on them)
Now the vents should be out, take them back in and get a good look at the back of them. Get a decent idea of where the Led's can be put on the bottom back of each one.
|
|
|
|
|
01-23-2005, 12:09 AM
|
#3
|
|
Gone
Join Date: Mar 2004
Location: Lockport Ny
Posts: 19,244
|
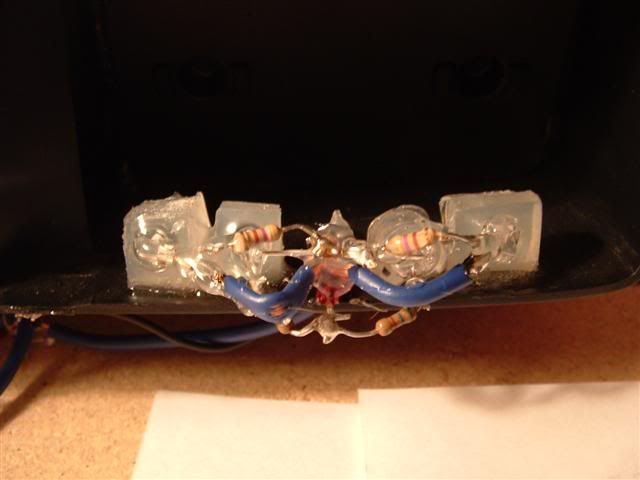
Now that the vents are out... Take the Led's and solder the resistors onto each one, I found it easier to solder each one onto the pin on the flat side of the LED. (if you look down at the pins pointing up, there should be a flat side on the LED)
now set up the small pieces of balsa wood. (anything will work, but i had some of this laying around.) I set up four pieces (about 1/2"long x 1/8" high) into a little box. Fill this little box with hot glue, and put the LED face down into the still hot glue. Make sure to hold it straight, and in a few seconds, the LED will have a semi-permanent clear box around it. Now just pull the balsa off the sides of it and repeat for each.
Now that you have each of the 7 LED's "boxed with glue" get your vents. i found it a little easier to drill a small hole in the back middle,about 1" up into the vent. (so if you were looking at the back of the vent, and went in the middle, inward about an inch, put a small hole about there.) this will be a good place to snake the wire down from, so its not blocking or openning any air flow from the vents. I put a small shot of hot glue in the hole, after putting the wire through (just to hold it there and close up the hole)
Next, take some epoxy, i made enough to just set one side of the the boxed LED into, then i just placed it in a good place in the back of the vent. Make sure they are facing forward, or maybe angle them a little so they point in more then pointing away from the walls of the vent.
Repeat for each vent. I had 2 in the left most
2 in each of the center vents
1 in the driver's side vent.
Now let the epoxy dry. (cue jepodary music)
|
|
|
|
|
01-23-2005, 12:19 AM
|
#4
|
|
Gone
Join Date: Mar 2004
Location: Lockport Ny
Posts: 19,244
|
Now that your led's are in place, or drying, get your wire and measure out a good length for each vent display. the centers don't take much. the left and rights require a bit of work, hiding the wire, but you can easily hide each. (kinda sloppily done, but who will ever see?)
The left most can be brought right over where the glovebox will be and join right over to where the center line will be.
The right most you can snake down to foot area, then just hide the line under the plastic shield below the steering column.
Now go back and solder some wires onto the LEDs. MAKE SURE TO KEEP THE HOT AND GROUND WIRES SEPARATE!!!!
I cannot stress that enough. preferable use two different color wire. solder the grounds, then solder the hots.
Now for the easy parts. Put the Vents back in, making sure the wires are all out and in the same similar area. Some people are going to wire these into a switch, some won't.
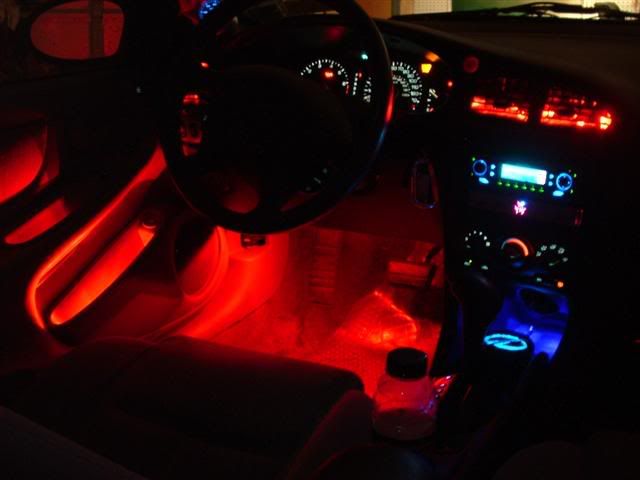
Personally i just spliced into the lights for the PNRD123, so when my interior lights kick on at night, the vents lights will along with them.
I also found it easier when combining these wires, to head over to your local radioshack, head into the small parts stuff, and get a little black plastic rectangle with 6 screws in it. then grab a clip that should be right near that last piece, its a bunch of connected metal "u"s. clip the "u"s into two sets of 3 and put them both on one side, connecting 2 sets of 3 pairs of screws. bring all your hot wires into the first three screws, then the grounds to the next 3. then all you need is one set of hot and ground coming off the side w/ the "U"s as you hot and ground for the whole setup.
congrats, your done. connect the last two wires, put your dash back together, and light'em up. looks good, right? 
    UPDATE EDIT: Follow this link, for a much "neater" install job.
http://www.aleromod.com/forums/showthread.php?t=5350
I redid that whole mess, when I got a little more skilled with everything. 
|
|
|
|
|
01-23-2005, 08:28 PM
|
#5
|
|
V.I.P. Member
Join Date: Apr 2004
Location: Western NY
Posts: 3,133
|
I dunno, does it look good?  
__________________
Yes it's modded, No it's not done, Yes it's fast, and no you can't drive it. **On a good day, my car has two blowers. 
Your car must be fast, you were haulin' ass when I passed you in my 4-door Buick. 
|
|
|
|
|
01-23-2005, 08:35 PM
|
#6
|
|
where my knickers at?
Join Date: Oct 2004
Location: misery
Posts: 4,074
|
Whoa, thanks a bunch cherrington!!
__________________
--UPDATE-- $88,000 in debt.
--UPDATE-- Have 6 months to start paying!
|
|
|
|
|
01-18-2010, 12:32 AM
|
#8
|
|
Premier V.I.P. Member
Join Date: Feb 2009
Location: Oxbow SK
Posts: 1,385
|
i know, i'm resurrecting an ancient thread, but i've got a few questions for cherrington
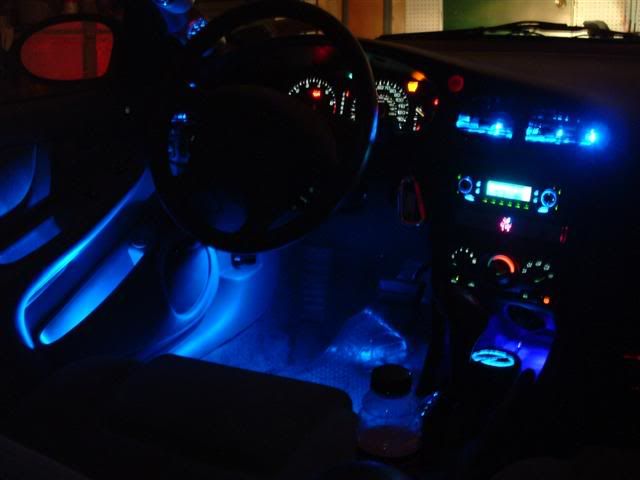
1. i want to light up the vents, and the floor (like in your picture). i'm thinking about ordering 25 leds. will that be enough?
2. i want the lights to all work with the stock dimmer. so can i just connect the lights to the center console light, replace it with led, and go from there? that way when the cars lights come on, they come on, and i can dim them with the rest of the lights.
3. what color looks nicer, the blue or the red. i'm getting blue to match the new gauges that are coming, but it might be too much blue. your thoughts since you have both colors.
4. how many leds per vent. and is the light equal (i know sand off the tips). i mean can you see where the led is in the vent, or is it just a nice glow.
5. is there anything you would of done different once you got it all back together?
sorry for the long post. thanks for reading
__________________
2002 Alero w/ 2.2 ecotec 5 speed
power window conversion, heated leather seats, 16" rims, high & low hids, auto dimming rear mirror, speedbuilt front and rear sway bars, poly bushings all around.
2005 Silverado 2500HD w/ 6.0l Vortec 4L80E
Tuned 6.0l, exhaust, intake, with 450000km on the odometer. Tow Rig
1985 Pontiac Trans Am GTA w/ 5.7 Vortec 700r4
mild vortec 350 with 4 speed auto. performance suspension. factory gold color. project car
|
|
|
|
|
01-18-2010, 08:52 AM
|
#9
|
|
Gone
Join Date: Mar 2004
Location: Lockport Ny
Posts: 19,244
|
better pictures:
http://www.aleromod.com/forums/showt...light=lighting
1/4/5)It depends on the size of the led used,and the brightness desired, as per how many you will need. I started out with the normal sized leds (5mm) and now have the small (3mm) and the 3s work/look so much nicer. Also, if you compare the pic in this one, as per the ones in the other thread I linked... I learned how to solder/mount a little better... 
Put the resistor IN LINE with the wire, instead off the back of the led. It won't matter where it is, as long as it is. This cleans up the work alot. Also, use epoxy to "seal" the metal leads in the vent. Hot glue will melt some when you have the heat on. You can use hot glue on the bottom, to seal those connections. Take your time with it. Every time I've done this, I start, get working... then something happens and I gotta rush to finish it. Rushing = shotty work. Also, have a 12V power supply around.. so you can test it all, before mounting (find a dark room). Test for brightness, mounting, if you can see it well, its looks goofy/unbalanced light. Also do this before and after mounting w/ glue.
25 should be fine. You'll probably have a few left over, to which a short few months later, you'll find another spot to put them. It ALWAYS happens.
2) If you want them to connect to the dimmer, connect them to ANY gray illumination wire. (that will power any bulb that can be dimmed by the dimmer) They will all come on at night, turn off during the day, and work with the dimmer.
3) I put red in, because i have a red car. I still love the blue. |
|
|
|
|
01-18-2010, 01:19 PM
|
#10
|
|
Premier V.I.P. Member
Join Date: Feb 2009
Location: Oxbow SK
Posts: 1,385
|
lol thanks cherry for the post. i have the green car, but soon blue gauges inside.
and the positive goes on the grey illumination wire. i thought i read somewhere that the leds can flicker when the lights are dimmed down.
and the led might actually havce to wait since ozium doesn't accept pay pal. damn it, i've got the money there already lol. any other sites that has leds as cheap as them?
and i was going to get the 5mm since they are cheaper. would you reccommend the 3mms instead, or maybe 3mm for vents, and 5mm for floor
__________________
2002 Alero w/ 2.2 ecotec 5 speed
power window conversion, heated leather seats, 16" rims, high & low hids, auto dimming rear mirror, speedbuilt front and rear sway bars, poly bushings all around.
2005 Silverado 2500HD w/ 6.0l Vortec 4L80E
Tuned 6.0l, exhaust, intake, with 450000km on the odometer. Tow Rig
1985 Pontiac Trans Am GTA w/ 5.7 Vortec 700r4
mild vortec 350 with 4 speed auto. performance suspension. factory gold color. project car
|
|
|
|
|
01-18-2010, 02:24 PM
|
#11
|
|
i speed up for corners
Join Date: Apr 2009
Location: Dover,NH
Posts: 3,489
|
damn the led vents look good. i am in the process of taking out the gauge cluster and getting red or white LEDS.
|
|
|
|
|
01-18-2010, 02:53 PM
|
#12
|
|
Gone
Join Date: Mar 2004
Location: Lockport Ny
Posts: 19,244
|
Definitely 5mm for floor. 5s can be used for vents too. No big deal there.
I usually buy like...100 at a time from ebay, but my last order was from oznium, since I got a bad batch from ebay, with the 3mm leds I had.
|
|
|
|
|
01-18-2010, 09:07 PM
|
#13
|
|
Premier V.I.P. Member
Join Date: Feb 2009
Location: Oxbow SK
Posts: 1,385
|
silly question. i'm looking at buying leds, but not sure what any of it means.
like these ones
and what resistors do i need to buy. (never mind, used this calculator http://led.linear1.org/1led.wiz)
can i hook up 5 leds to one resistor, or resistor per led, then hook each one up to the 12v
http://cgi.ebay.ca/100x-BLUE-EXTRA-B...item33596270cf
under the technical specifications
or what about these. they come with resistors.
http://cgi.ebay.ca/100-pcs-X-5mm-UV-...item19b9249b71
i'm not sure how bright and stuff. this is all new to me
__________________
2002 Alero w/ 2.2 ecotec 5 speed
power window conversion, heated leather seats, 16" rims, high & low hids, auto dimming rear mirror, speedbuilt front and rear sway bars, poly bushings all around.
2005 Silverado 2500HD w/ 6.0l Vortec 4L80E
Tuned 6.0l, exhaust, intake, with 450000km on the odometer. Tow Rig
1985 Pontiac Trans Am GTA w/ 5.7 Vortec 700r4
mild vortec 350 with 4 speed auto. performance suspension. factory gold color. project car
Last edited by colonel6632 : 01-18-2010 at 09:22 PM.
|
|
|
|
|
01-21-2010, 01:51 AM
|
#14
|
|
The Aleromod PITA
Join Date: Feb 2009
Location: East Carolina University, GVegas, NC
Posts: 1,852
|
um if your new you could go to autozone, buy those 4 bulb type led's and shuve them way back in the vents, thats what some friends did.
|
|
|
|
|
01-21-2010, 06:42 AM
|
#15
|
|
Gone
Join Date: Mar 2004
Location: Lockport Ny
Posts: 19,244
|
Quote:
Originally Posted by AleroDrime

um if your new you could go to autozone, buy those 4 bulb type led's and shuve them way back in the vents, thats what some friends did.
|
disregard this post. that is the dumbest thing you can do. that'll look like crap. |
|
|
|
|
01-21-2010, 09:01 PM
|
#16
|
|
A-mod Pirate
Join Date: Jul 2008
Location: Big Bad Cali
Posts: 3,016
|
hahahha, its almost as good as his post about puttin blue nail polish over the regular bulbs
|
|
|
|
|
01-21-2010, 09:07 PM
|
#17
|
|
Now a Ford Traitor.
Join Date: Mar 2008
Location: Greenland
Posts: 6,996
|
Quote:
Originally Posted by heineck
hahahha, its almost as good as his post about puttin blue nail polish over the regular bulbs
|
O_O.... |
|
|
|
|
01-21-2010, 10:52 PM
|
#18
|
|
The Aleromod PITA
Join Date: Feb 2009
Location: East Carolina University, GVegas, NC
Posts: 1,852
|
i hate you guys
|
|
|
|
|
01-22-2010, 06:41 AM
|
#19
|
|
Gone
Join Date: Mar 2004
Location: Lockport Ny
Posts: 19,244
|
halogen bulbs with a coating are terrible for color, and don't last long at all. total crap.
|
|
|
|
|
01-22-2010, 02:25 PM
|
#20
|
|
The Aleromod PITA
Join Date: Feb 2009
Location: East Carolina University, GVegas, NC
Posts: 1,852
|
ive seen it on other forums recently for sentras, though they claim use high temp paint but led is the way to go, however for my trunk and dome light i did find these little blue silicone sleaves for color, theyre alright and r gonna be fine till i get led's there
theyre next on my list to do too, i just ordered some more 194 led's to play with
|
|
|
|
|
Currently Active Users Viewing This Thread: 1 (0 members and 1 guests)
|
|
|
| Thread Tools |
Search this Thread |
|
|
|
| Display Modes |
 Linear Mode Linear Mode
|
 Posting Rules
|
You may not post new threads
You may not post replies
You may not post attachments
You may not edit your posts
HTML code is Off
|
|
|
All times are GMT -4. The time now is 06:09 AM.
|